Welcome to this detailed, hands-on manual for the AWS Academy Cloud Architecting Challenge Lab: Migrating a Database to Amazon RDS. This guide is based on the official lab instructions and the excellent walkthrough video:
Challenge Lab: Migrating a Database to Amazon RDS (YouTube Walkthrough)
This lab teaches you how to migrate a MariaDB database from a self-managed instance on EC2 to a fully managed Amazon RDS service. You’ll export data, import it into RDS, secure connectivity, and update a PHP web application to use the new database—all while decoupling compute and storage for better manageability, scalability, and cost efficiency.
Lab Duration: ~80 minutes
Key Services: Amazon RDS (MariaDB), EC2, Secrets Manager, VPC Security Groups, Session Manager
Objectives:
- Create a managed RDS MariaDB instance
- Export data using
mysqldump - Securely connect EC2 to RDS
- Import data and switch the application
- Stop the local database for cleanup
Let’s dive in with every minor step explained.
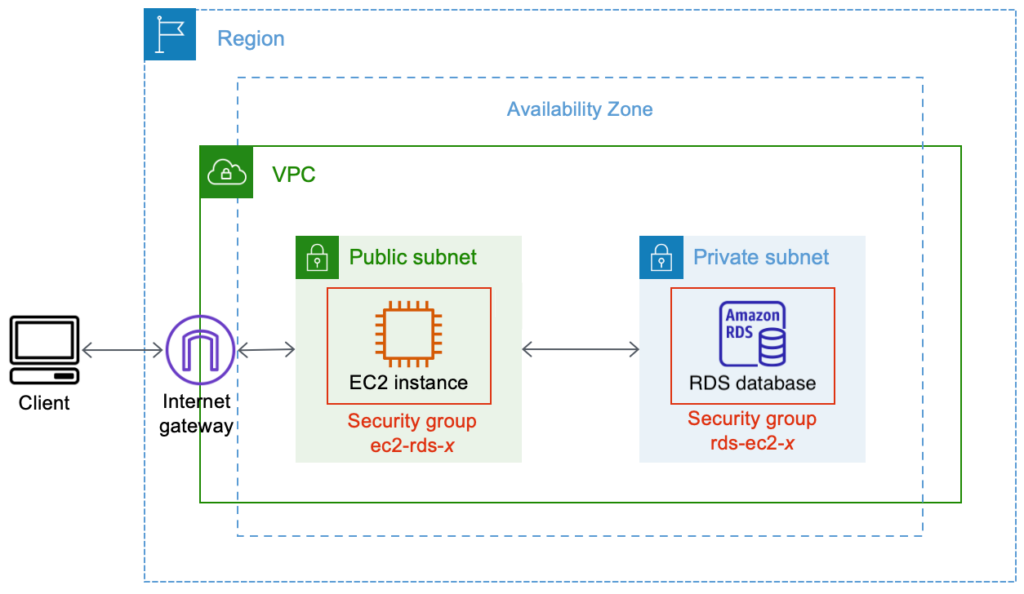
Final architecture: EC2 web server connected to RDS database
Phase 1: Creating the Amazon RDS Instance
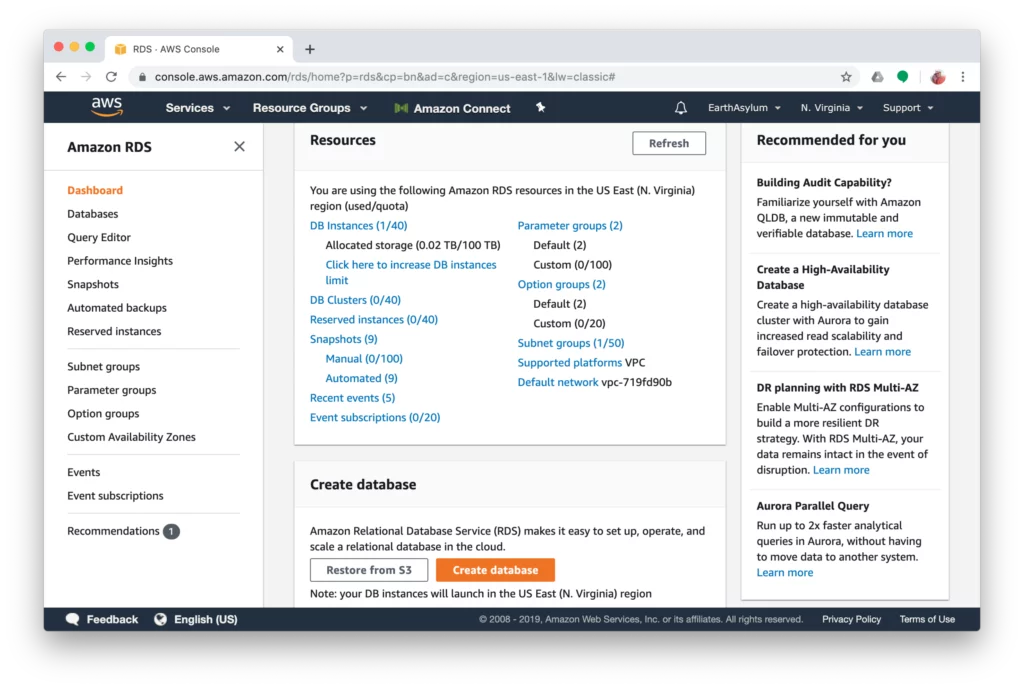
Step 1: Navigate to RDS Console
- Open the AWS Management Console.
- Search for RDS and open the Amazon RDS console.
- Ensure you’re in the correct Region (usually us-east-1 for the lab).
Step 2: Create Database with Exact Specifications
Click Create database.
Configure exactly as follows (these are graded!):
- Engine options → Engine type: MariaDB
- Templates: Dev/Test
RDS creation screens – select MariaDB and Dev/Test template
Settings:
- DB instance identifier:
CafeDatabase - Master username:
admin - Master password:
Caf3DbPassw0rd!(copy-paste exactly!) - Confirm password: Same
Instance configuration:
- Burstable classes →
db.t3.micro
Storage:
- Storage type: General Purpose SSD (gp2)
- Allocated storage: 20 GiB
Availability & durability: Do not create a standby instance
Connectivity:
- VPC: Lab VPC
- DB subnet group: lab-db-subnet-group
- Public access: No
- VPC security group: Select dbSG (remove default)
- Availability Zone: First one ending in a (e.g., us-east-1a)
- Database port: 3306 (default)
Monitoring: Clear Enable Enhanced Monitoring (not supported in lab)
Click Create database.
You don’t need to wait for “Available” status — proceed immediately.
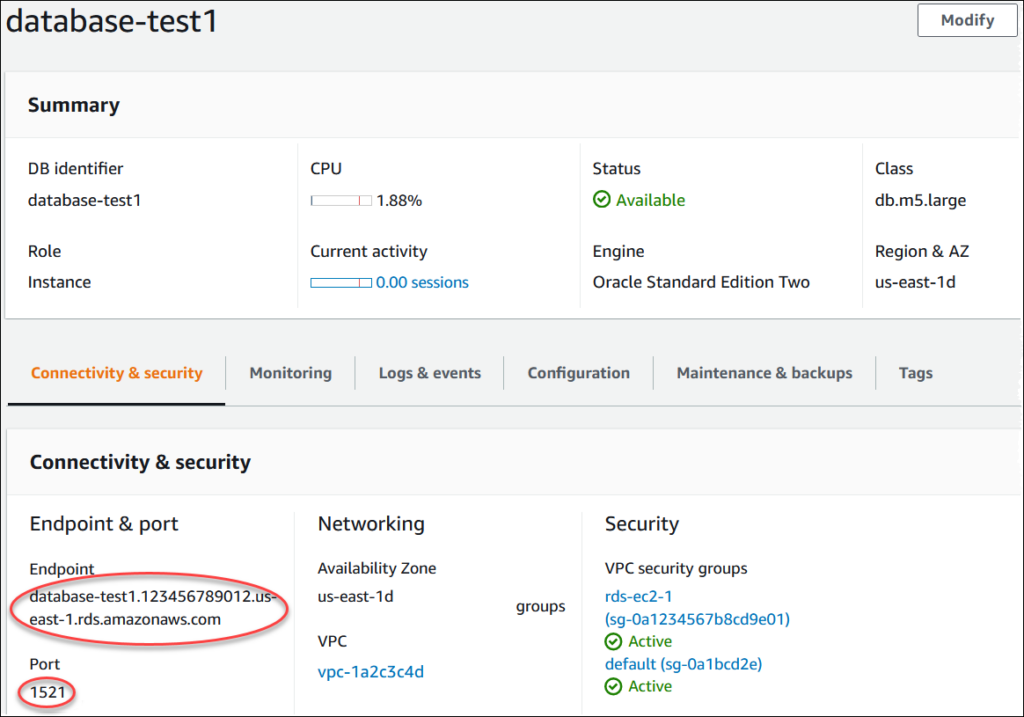
Note the RDS endpoint after creation – you’ll need it soon
Phase 2: Analyzing the Existing Café Application & Exporting Data
Step 1: Test the Current Café Website
- Go to EC2 console → Instances.
- Find the instance named CafeServer.
- Copy its Public IPv4 address.
- Open browser:
http://<public-ip>/cafe - Navigate to Menu → Increase quantity of an item → Submit Order.
- Go to Order History — you should see existing orders.

Café online ordering menu – place a test order
Step 2: Connect to EC2 via Session Manager
- In EC2 console, select CafeServer instance.
- Click Connect → Session Manager tab → Connect.
A new tab opens with a terminal as ec2-user.
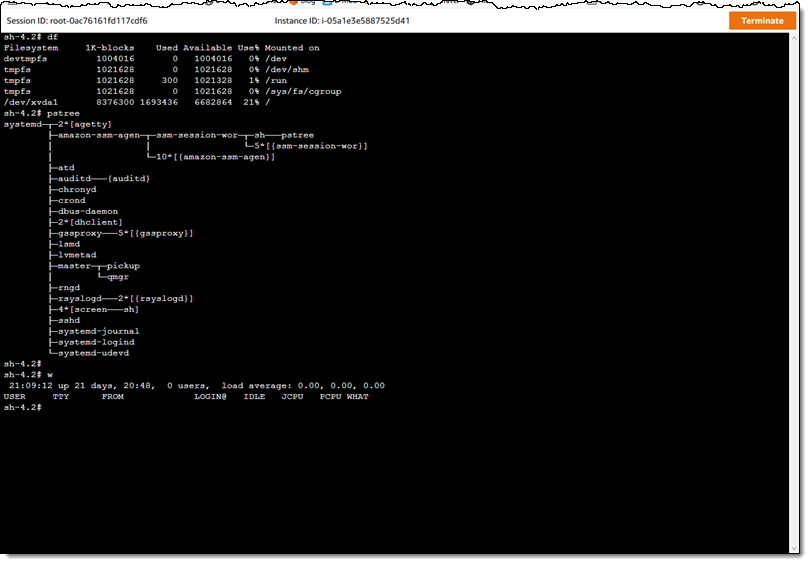
Session Manager terminal connection
Step 3: Check Local MariaDB and Export Data
Run these commands:
service mariadb status
mysql --version
Both should confirm MariaDB is running.
Get the local DB password:
- Open Secrets Manager console.
- List secrets → Click
/cafe/dbPassword→ Retrieve secret value → Copy the password.
Secrets Manager – retrieve dbPassword
Connect to local DB:
mysql -u root -pPaste the password.
Explore data:
show databases;
use cafe_db;
show tables;
select * from `order`;
select * from `order_item`;
exit;
Export the database:
mysqldump --databases cafe_db -u root -p > CafeDbDump.sqlPaste password when prompted.
Verify:
ls
cat CafeDbDump.sql | head   # View first lines
mysqldump in action
Phase 3: Connecting to RDS and Importing Data
Step 1: RDS Instance Questions (for grading)
- Where is it running? Private subnet (in Lab VPC)
- Public IP? No
- Subnet tag? Check subnet details (usually private)
- Security group rules? Initially minimal
Step 2: Enable Connectivity from EC2 to RDS
- Go to RDS console → Click
CafeDatabase→ Copy the Endpoint (e.g.,cafedatabase.xxxx.us-east-1.rds.amazonaws.com). - In Connectivity & security → Security group (
dbSG) → Edit inbound rules. - Add rule:
- Type: MySQL/Aurora (3306)
- Source: Security group ID of the EC2 instance (search “sg-” to find CafeServer’s group)
Add inbound rule allowing EC2 security group on port 3306
Test connectivity:
mysql -u admin -p --host <rds-endpoint>Enter RDS password: Caf3DbPassw0rd!
Run:
show databases;You should see default DBs but no cafe_db yet.
exit;Step 3: Import the Dump File
mysql -u admin -p --host <rds-endpoint> < CafeDbDump.sqlEnter RDS password.
Reconnect and verify:
mysql -u admin -p --host <rds-endpoint>Then:
show databases;
use cafe_db;
show tables;
select * from `order`;   # Should show ~24+ orders
exit;
Importing the SQL dump into RDS
Phase 4: Switch Application to RDS and Clean Up
Step 1: Update Secrets Manager Values
The app uses Secrets Manager for DB config.
Update these secrets:
/cafe/dbUrl→ Set to the RDS endpoint/cafe/dbUser→admin/cafe/dbPassword→Caf3DbPassw0rd!
Leave others unchanged (currency, dbName=cafe_db, timeZone, showServerInfo).
Update dbUrl, dbUser, dbPassword in Secrets Manager
Step 2: Stop Local Database and Test
In Session Manager terminal:
sudo service mariadb stopRefresh the café website: http://<public-ip>/cafe/menu.php
- Place a new order → Should succeed
- Check Order History → New order appears alongside migrated ones
Everything now runs on RDS!
Key Learnings & SAA-C03 Exam Tips
- RDS benefits: Automated backups, patching, scalability — no admin overhead
- Migration pattern:
mysqldump→ import is standard for homogeneous migrations - Security best practice: Use security groups (not IP ranges) for VPC-internal access
- Application integration: Secrets Manager + IAM role keeps credentials secure and rotatable
- Cost optimization: After migration, downsize EC2 (smaller instance, less EBS)
This lab reinforces the Well-Architected Framework pillars: Operational Excellence, Security, Reliability, and Cost Optimization.
If you’re following the video, pause after each section and execute — hands-on is key!
Er. Bikash Subedi

Leave a Reply